

Guide to Effective Shopify API Integration
TL;DR
- Shopify APIs allow you to manage store data and create custom e-commerce solutions.
- Different APIs serve specific needs like backend management, custom storefronts, and managing multiple stores.
- Set up an account, create a test store, and secure your app with proper authentication.
- Improve performance by reducing unnecessary calls and optimizing data management.
What drives merchants to seek new ways to connect their stores with the tools they rely on every day?
Retail e-commerce sales reached $300.2 billion, a 6.1% increase from the first quarter of 2024; e-commerce accounted for 16.2% of total retail sales. As online businesses grow, so does the need to keep store data, inventory, and customer experiences tightly connected across platforms. As we know, many store owners find themselves frustrated by manual updates, data silos, and the constant challenge of keeping systems in sync.
We understand how overwhelming it can be to manage the complexities of API integration while ensuring data accuracy, security, and compliance, challenges that many digital marketers and IT professionals face daily. This guide walks you through creating a Shopify Partner account, setting up a development store and custom app, generating and configuring API credentials and permissions, and ensuring a streamlined setup process.
What Is Shopify API and How Does It Work?
The Shopify API is a set of RESTful and GraphQL interfaces that allow you to interact programmatically with a Shopify store’s data. From managing orders and products to handling customer data and configuring storefronts, these APIs offer a secure and scalable approach to building tailored e-commerce experiences.
CRUD operations mean Create, Read, Update, and Delete actions that let you manage Shopify store data effectively.(create, read, update, and delete) You can choose between two key styles:
- REST API: Traditional endpoint-based access with predictable HTTP verbs.
- GraphQL API: Flexible, performance-optimized queries that let you retrieve only the data you need in a single call.
Both APIs require authentication and respect Shopify’s versioning and rate limits. Now, let’s examine the various types of Shopify APIs and their distinct purposes within your integration.
Types of Shopify APIs You Can Work With
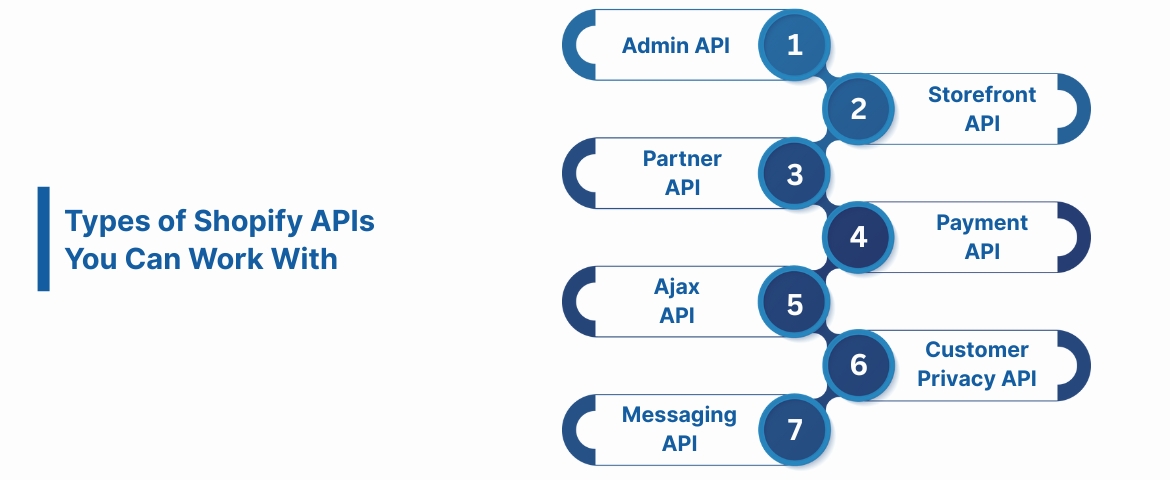
Choosing the right API depends on whether you’re working on backend logic, frontend customization, partner-level tooling, or third-party services.
Below are the key types of Shopify APIs and their specific roles:
1. Admin API
Use Case: Backend management of a Shopify store
The Admin API is the most commonly used API for Shopify integrations. It allows developers to create, read, update, and delete store data such as:
- Products and variants
- Orders and transactions
- Customers and their details
- Inventory and fulfillment data
- Discounts, shipping, and checkout configurations
This API supports both REST and GraphQL formats and requires a custom or private app for authentication. It’s ideal for building dashboards, automation tools, or syncing Shopify with your CRM, ERP, or PIM systems.
2. Storefront API
Use Case: Custom storefronts and headless ecommerce
The Storefront API is designed for customer-facing applications. It allows you to build your own shopping experiences (headless commerce) using JavaScript, mobile apps, or static site generators. With it, you can:
- Fetch product listings and collections
- Manage carts and checkout sessions
- Authenticate customers
- Query customer order history
It only supports GraphQL, making it highly performant and flexible, especially when building PWA or mobile frontends.
3. Partner API
Use Case: Managing development work across multiple stores
This API is designed for Shopify Partners, developers, or agencies that manage multiple client stores or apps. It provides access to:
- App usage and billing data
- Store information (linked to your Partner Dashboard)
- Theme and app deployments
It’s most useful when you're building SaaS apps listed in the Shopify App Store or managing a portfolio of client stores.
4. Payment API
Use Case: Building a Custom Payment Gateway.
The Payment API enables payment providers to build integrations that seamlessly work within Shopify's checkout system by supporting the creation and authorization of transactions, management of payment sessions, and handling 3D Secure flows and fraud checks.
The Payment API requires approval from Shopify Plus. It adheres to PCI-DSS standards, which are a set of security standards designed to ensure that all companies processing, storing, or transmitting credit card information maintain a secure environment.
5. Ajax API
Use Case: Frontend interactions in Shopify themes
This browser-based JavaScript API is used for lightweight ecommerce actions on the storefront without requiring page reloads. It’s commonly used in Liquid themes for:
- Adding/removing items from the cart
- Updating product quantities
- Retrieving cart totals or product availability
No authentication is needed since it's client-side, but it’s limited to public actions and can’t access sensitive store data.
6. Customer Privacy API
Use Case: Ensuring Privacy Compliance with GDPR, CCPA, and Other Relevant Regulations
This API helps merchants respond to customer data requests. It’s required for apps that access personal data, supporting:
- Data redaction (deletion requests)
- Access requests (view data collected)
- Opt-out preferences for data tracking
All public apps must integrate with this API to remain compliant with Shopify’s privacy standards.
7. Messaging API
Use Case: Customer communication via Shopify Inbox
The Messaging API enables apps to send and receive messages within the Shopify Inbox system. It’s useful for building:
- Chatbots
- Automated customer support flows
- Order-related updates through messaging
This API enhances engagement directly within the buyer journey, particularly for merchants utilizing real-time chat for support or conversions.
After understanding the different Shopify API types and their purposes, we’ll now go through the step-by-step setup of your Shopify API integration to get you up and running with ease.
Step-by-Step Shopify API Setup Tutorial
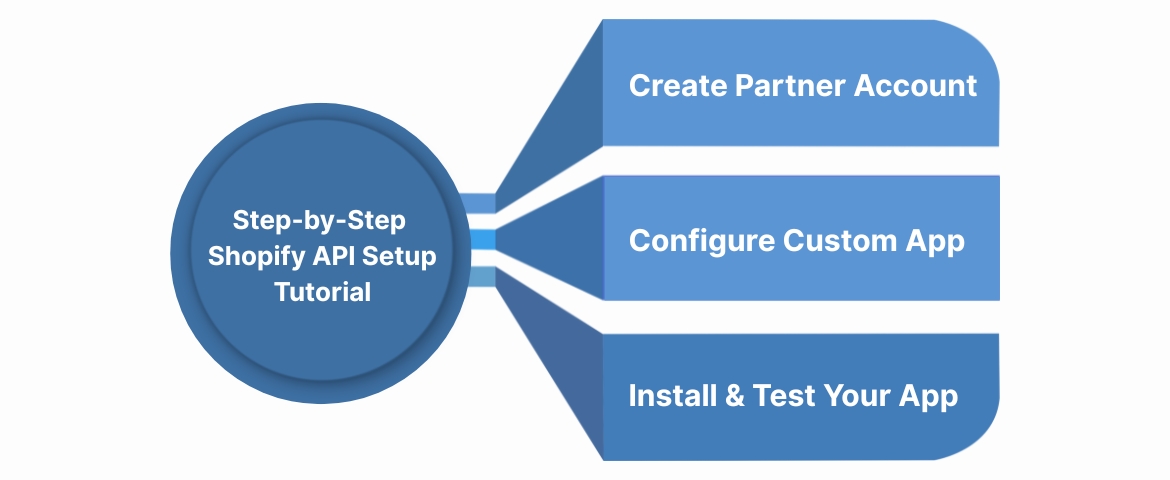
This section provides a step-by-step tutorial, starting with setting up the correct development environment and implementing secure authentication. It guides you through creating a Shopify Partner account, setting up your custom app, generating API credentials, and managing ongoing integration to keep your store running smoothly.
1. Create a Shopify Partner Account and Development Store
Start by signing up at partners.shopify.com. This account gives you access to development tools, API documentation, and the ability to create test environments.
From your Partner Dashboard, add a Development Store. This sandbox store is designed for building and testing apps without any billing setup or live customer data. Just enter a store name and URL to get started.
2. Create and Configure Your Custom App
In your development store, navigate to Apps → App Development → Create an App. Name your app and select yourself as the developer (your Partner account). Once created, Shopify will generate essential API credentials, including:
- Admin API access token
- API key
- API secret key
These credentials enable authenticated communication between your app and the store. Never expose tokens in client-side code.
Next, go to the app’s Configuration and assign only the permissions your app needs, such as read_products write_orders. If you're using the Storefront API, enable it and assign relevant scopes there as well.
3. Install and Test Your App
With the app configured, click Install App in your development store. Shopify will issue the Admin API access token upon installation. Use this token in your headers to make secure API requests.
You can now test your integration using Postman, cURL, or simple scripts. Here's an example with cURL:
curl -X GET "https://your-store.myshopify.com/admin/api/2024-04/products.json" \
-H "X-Shopify-Access-Token: your-access-token"
If set up correctly, the API will return your store's product data in JSON format.
Now that we’ve set the stage, let’s talk about how you can securely authenticate and manage your credentials during the integration process.
Authentication and Security Best Practices
Authenticating with the Shopify API is straightforward but requires careful handling to maintain data integrity and privacy. Depending on the type of your app, custom, private, or public, you’ll use different methods to authenticate and interact with the platform securely.
1. Admin API Authentication
Custom and private apps use access tokens to authenticate with the Admin API. Once your app is installed on a store, Shopify provides a token, which you must include in the X-Shopify-Access-Token header of every request. This token serves as a key to the store's data; therefore, treat it with utmost sensitivity.
2. Storefront API Authentication
The Storefront API uses a public token that is safe to include in frontend applications. However, it’s restricted to specific read-only scopes to prevent exposure of sensitive information. While this method is easier to implement, it’s only suitable for client-side experiences such as custom storefronts.
3. OAuth 2.0 for Public Apps
If you're building a public app listed on the Shopify App Store, you'll need to implement OAuth 2.0. This protocol allows merchants to grant access to their store without exposing credentials. OAuth 2.0 allows users to authorize your app securely by redirecting them to Shopify’s login, granting limited access tokens without sharing passwords. After authorization, your app receives a unique access token that will enable it to make API calls on behalf of the user.
4. Credential Management
Keep your tokens, API keys, and secrets secure. Never expose them in browser code or commit them to version control systems. Use environment variables for local and production environments, and limit scopes to only what your app needs. For example, if you're not modifying orders, avoid granting write_orders permissions.
5. Security Considerations
Always use HTTPS when communicating with Shopify APIs. Monitor your application logs for unusual activity, and implement rate limiting on your end to avoid abuse. Shopify’s API versioning ensures backward compatibility and introduces regular security updates; always target the latest stable version to stay secure.
Once merchants are comfortable with the Shopify API basics, they can enhance their data governance and tag management using platforms like Ingest Labs, which provide privacy-first solutions to optimize integrations further. Ingest Labs provides centralized control over all data collection processes, including web and mobile tagging, tag monitoring, and real-time data streaming, ensuring compliance with global privacy laws and minimizing the risk of unauthorized data exposure.
Once your integration is secure, the next priority is performance. As your store scales, managing API usage, data flow, and tag execution becomes more complex, and inefficient setups can slow everything down.
That’s where Ingest Labs helps. Built for privacy-first data orchestration, it streamlines tracking, reduces load on your store, and ensures data flows stay fast and reliable.
How Can You Optimize Your Shopify API Integration for Performance?
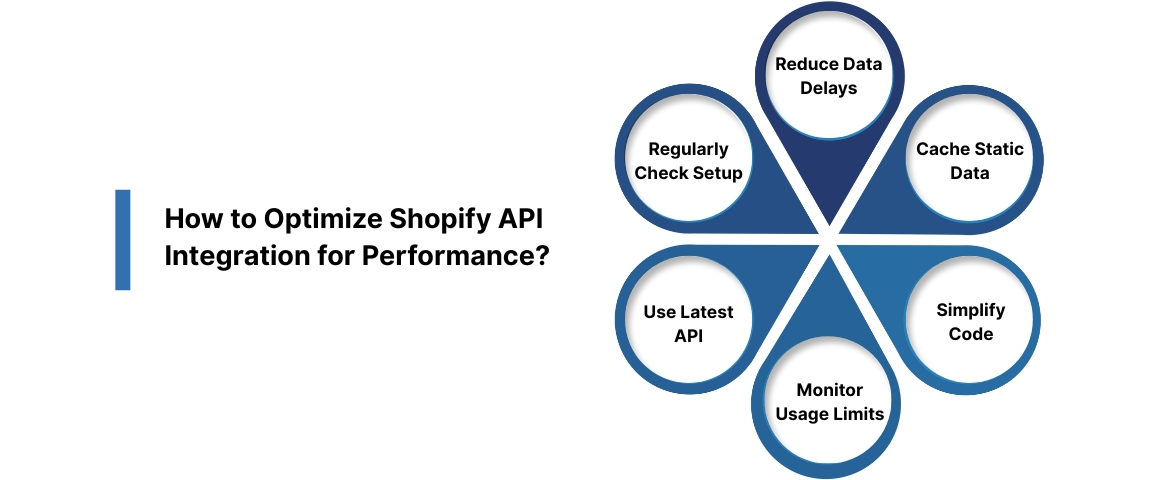
Shopify API integrations often encounter slow responses, repeated data requests, and rate limit issues as they scale. To improve performance, start by reducing duplicate calls, caching stable data, and requesting only the necessary information. Once that’s in place, advanced tools like Ingest Labs' server-side tracking and real-time event streaming can help you scale efficiently and keep things running fast. Here’s how to stay ahead:
- Reduce delays in data requests by using GraphQL to retrieve multiple pieces of data in a single request, rather than making numerous separate calls. You can also use Ingest Labs Web Tagging to move tracking from the browser to the server. This reduces the number of requests your store needs to handle, which in turn helps your pages load faster.
- Cache data that doesn’t change often: Store details like product info locally instead of calling the API every time. With Ingest IQ’s Data Streaming, you can send essential event data straight to your analytics tool in real time, so you don’t need to keep checking the API.
- Keep your code simple: Avoid repeating the same calls or writing extra steps. Ask only for the data you need. Using Ingest’s Tag Manager can help you manage all your data and tracking logic in one place, making everything easier to maintain.
- Watch your usage limits: Shopify limits the number of API calls you can make per month. Keep an eye on your usage and be ready to retry if you get an error. Ingest Tag Monitoring & Alerts can notify you right away if something breaks or slows down.
- Use the latest API version: Shopify frequently updates its APIs. Ensure you’re using the most up-to-date version to prevent your integration from stopping working. Ingest Tag Manager can help you update your connections smoothly.
- Check your setup regularly: periodically review your error logs and data flows to identify slow parts or outdated logic. Ingest Live Debugging lets you see what’s happening in real time, so you can fix problems as they come up.Performance is a critical factor when integrating with Shopify, and several techniques are available to reduce unnecessary load on your system while maintaining speed and responsiveness.
Final Thoughts
Setting up and optimizing your Shopify API integration isn’t just about connecting endpoints; it’s about building a system that’s fast, secure, and adaptable as your store grows. From handling authentication and rate limits to streamlining request logic and performance, each step impacts how effectively your data-driven processes work.
But integration doesn’t end with API calls. The real challenge is managing what comes next: monitoring data quality, securing privacy compliance, and orchestrating events across your entire ecommerce stack.
That’s where Ingest Labs makes a difference. As a privacy-first data platform, Ingest Labs helps you take your Shopify API setup to the next level. With Ingest IQ, you can move tracking server-side, simplify tag management, and stream real-time data to CDPs or analytics platforms, without bloating your store’s frontend. Its no-code configuration, live debugging, and privacy-compliant architecture make it a powerful ally for both developers and growth teams.
Need deep insights, better attribution, or faster debugging across your Shopify store and mobile app? Ingest Labs was built for that.
FAQ
- How to integrate Shopify with API?
To integrate Shopify using its API, you need to create a custom app within your Shopify admin, configure the required permissions, generate API credentials, and then use REST or GraphQL to send and receive data between your system and the Shopify store. - What is the process of API integration?
The API integration process involves creating a Shopify Partner account, setting up a development store, building a custom app, configuring API scopes, authenticating using access tokens, and making API requests to interact with store data. - How many types of API are there in Shopify?
Shopify offers seven types of APIs: Admin API, Storefront API, Partner API, Payment API, Ajax API, Customer Privacy API, and Messaging API, each serving different aspects of store management and app development. - How to make a Shopify integration?
You can create a Shopify integration by using the Admin API for backend operations or the Storefront API for customer-facing features. After setting up authentication, you can build your logic to manage products, orders, and customer data as needed. - How to integrate Shopify with other platforms?
To integrate Shopify with other platforms, such as CRMs, CDPs, or analytics tools, you can use APIs directly or employ platforms like Ingest Labs, which offer unified, no-code connectors and server-side orchestration to simplify and centralize the integration process.